Evented UI: Mouseover Tooltips

I’ve recently posted a new RPG Maker Video showing a user interface made mostly from events with just a few plugins.

While it was fun learning to do a lot of the tricks in it, I think what will be generally the most useful is the Tooltip Popups for the items.

There are actually a lot of possible plugins you could use with this to show the tooltip. I’ve used Yanfly’s Gab Windows and GALV’s Timed Message Popups, but since the point of this project was to use as few plugins as possible, I just went with a Show Picture event here.

Managing the Mouseovers does require using a Plugin however, and I use TDDP Mouse System EX.
This is a plugin that I already consider staple in every project because it has the menu items selected as soon as the mouse moves over them, so each menu item only has to be clicked a single time instead of clicking once to select, then a second time to activate.

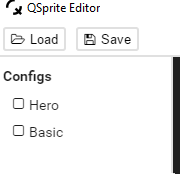
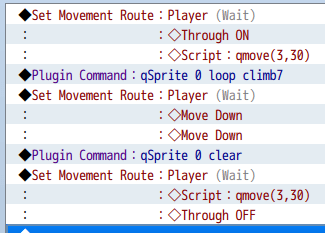
Ignore Pages 1 & 2 for now, those are both for “havent seen the item yet” and “don’t have any of the item at the moment”. Page 3 is the basis for having an item, and showing a tooltip when the mouse moves over the event.

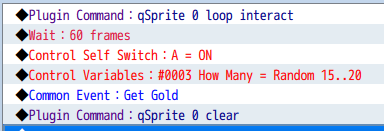
The Comment “hover_activate!” is used by the plugin to make the event commands on this page execute when the mouse moves over the event. In this case, when the mouse moves over the event, I use a Show Picture event to show an image with my tooltip text. Then I change the Self Switch A to On to be able to handle when the mouse moves away from the event.

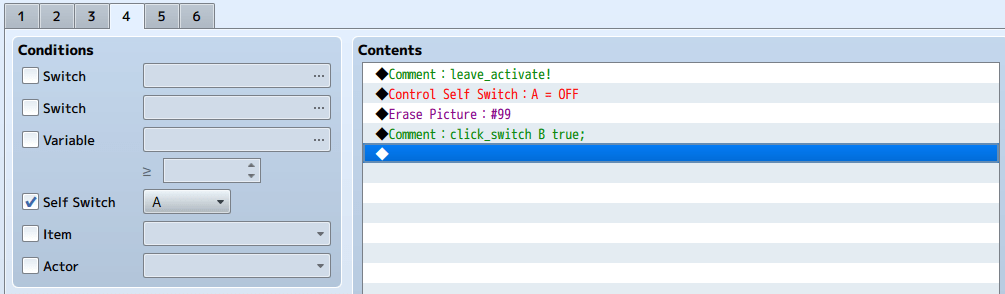
With Self Switch A turned on, the new event page has a “leave_activate!” comment that will run the event commands on the page when the mouse moves off of the event. In this page, I Erase the picture shown when the mouse moved over the event, and then turn the Self Switch Back off, so the event is ready to handle when the mouse moves in again.

This event also has the “click_switch B true;” comment line. With this, if the mouse button is clicked while the mouse is over the event, Self Switch B gets turned on.

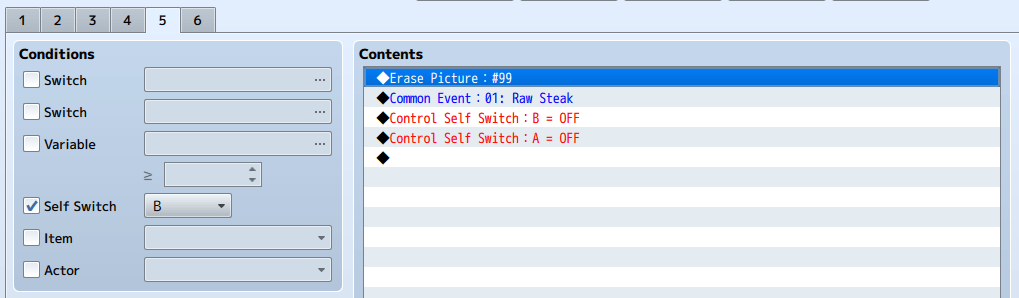
The Self Switch B page is where the actual functionality of the event being triggered will occur. This Page should be set up as AUTORUN so that the event will take over and do what it needs without the player being able to interrupt it.
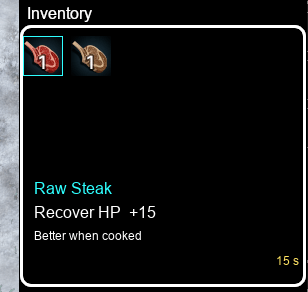
In this case, I start by Erasing the Tooltip image. Then I called a common event to actually perform the action related to the event, in this case, eating the raw steak. Finally, I turn off Self Switch B to stop the AUTORUN and prevent it from looping, then turn off Self Switch A to reset the event to be ready for the mouse to move over it again.

While I used this process here for a custom item management system, this could also be used for doing a world-map with mouseover popups for towns and dungeons, or for quick-viewing lore items scattered around a map, or possibly other creative things I haven’t thought of yet.

Into The Desert

When I think of Desert maps, I think of big empty expanses of boring. Because of that, I have never really tried to develop any desert maps myself, until now.

After doing a couple of test maps, I created this video to follow along as I created a new desert map from scratch.

Even if you aren’t interested in mapping deserts, it’s another example of some mapping techniques that I hope people will find useful.

Video Series by Padr81

I haven’t had much to post here lately as I have been working on an actual game storyline and not mechanics.

But recently a fellow designer has started his own video series for using PV Games resources and RPG Maker. His series is taking a very step-by-step approach to the entirety of the game, instead of piece-meal topics like I approach them.

We have different design styles, and have been learning new techniques from each other, so I do recommend his videos if you want another perspective or more details on the build process.

Below is the link to his Playlist on YouTube.

Battle: Follow Up Skills

I have been working a lot lately on trying to take the default RPG Maker battle system and make the skill use more interesting. My favorite thing I have come up with is a system that relies heavily on follow up skills.

As an example, I can set up a fighter type character with his own basic skill that replaces the default Attack, and when used, will allow him to select from possible follow-up skills he has learned.

Slash: Basic Attack, Allows Follow-Up Skills
-> Jagged Slash: Causes Bleeding (Only after Slash)
-> Stunning Blow: Stuns Target (Only after Slash)
-> Parry: Increases Defense, Allows Riposte Skill (Only after Slash)
-> Riposte: Ignores Defense (Only after Parry)

With this idea, on the player’s first turn, they only have access to their two basic skills. After using the Slash Skill, on their second turn the follow-up skills will be available to use. These skills will be available for only that turn, so are wasted if either of the basic skills are used.

To set this up, the character is set up with only the Basic Skills learned.

The follow up skills are enabled when appropriate by adding states to the player which will in turn add the skill to their action list. These states are set up with Action End after 1 turn so that they can only be used on the turn immediately following the turn that activated them. I forgot it in the below screenshot, but “Remove at Battle End” should also be set, to prevent ending one battle on a Slash Skill and being able to start the next battle with one of the follow-up skills.

When the Slash skill is used, these follow-up skill states can be added by a Common Event.

But now, I don’t want the player to have access to all of the follow up skills at the start of the game. I like the chance to develop the character as the game progresses, so I want the player to only have the Jagged Slash follow up at the start of the game, but be able to learn Stunning Blow and Parry later.

Planning for this is why I created a separate state for each follow-up skill originally, instead of having one state add all three skills.

To handle this, I can create a switch for each follow up skill that will be learned later in the game. When each skill is “learned”, the switch gets enabled. Then the Common Event when the Slash Skill is used can check those switches to see which states should be added based on which skills have been learned.

Everything here can be done with only the default MV Battle System and no Plugins installed. When using this, I do recommend either a plugin that lets you change each characters “Attack” skill to replace it with their Base skill that enables follow ups or else one that removes the “Attack” command completely. I prefer the second option, so I can give characters multiple base skills each with their own follow-up chains.

The one problem this system has is that the follow up skills are only available during battle when the state is on the player, so the follow up skills cannot be viewed in the Skills menu outside of combat.

If you use a Plugin that will hide un-usable skills during battle, then you can create a second copy of the follow-up skills that that can be learned so it shows up in the Skills menu for viewing, but not during battle. I personally like using the Plugin BOB_BattleCommandList which does allow me to use this option.

In my opinion, combining this system with a Skill Cooldown Plugin so certain skills like the Stun Follow-Up can’t be spammed every other turn results in a more interesting turn-based combat system that encourages using a variety of skills.

QSprite Editor

Not much to say in this post. The new QSprite Editor video says it all.
I also realized I didn’t include the video of the test animations in the last post, so it is here as well. I hope this helps everyone trying to get this set up.

Configuration Setup: QSprite Parameters

Configuration Setup: QSprite Editor Configurations

Configuration Setup: Character Sheet Filenames

Animations with QSprite

Once QMovement is set up, setting up animations to work with QSprite is the clear next step. There is a lot of extra work up front for using QSprite, but the payoff is worth the extra effort.

To start with, you have to define your sprite sheet layouts. QSprite can use sprite sheets of any size, but characters are still limited to a single sprite sheet being available to a character at a time. You could use the giant mastersheets and change the character sheet out but that would result in flicker while the large spritesheets load when being swapped. Instead, I prefer to create my own spritesheets that only include the animations that I need to use in my game.

You can create multiple sprite sheet layouts, so I use two in my project:
Basic – Has just the Idle, Walk, and a Behavior animation in it. This can be used for enemies and basic NPCs that just need facing and movement.
Hero – This is a full animation sheet with varied set of animations used only for main characters. It is larger so slow to load at startup, but because it has all of my animations, there is no sheet swapping and no flicker.

I’ll do a full video later for QSprite setup, but for now, here is a sample of my QSprite Configuration to use as an example.

QSprite uses the following animations automatically:
idle
move
dash
All other animations can be called by Plugin Commands. Some examples of animations that I use in my Hero Spritesheet are kneel, climb, jump, kick, drink, and interact. When setting up QSprite, I also set up some to play backwards: unkneel, unjump, unkick. These play the animations in reverse to use as an end animation, such as standing back up with unkneel instead of just flickering from kneel back to standing.

Example Events Using Animations

Kneels down, changes the self switch to remove the graphic of the item being picked up (and prevent picking it up again), calls the common event to get the item, then plays the unkneel animation to stand back up, and finally clears the animation.

Note that the “lock pause wait” parameters for the play animation keep the character kneeling and prevent the player from moving until the event is finished. The clear command releases the character to normal animations and play.

This example plays the looping interact animation while the gold is being picked up, then after the frame wait is completed, turns the animation back off.

This last example is used for climbing. It starts by moving the player closer to the edge of the wall with a QMovement script command before starting the looping climb animation. In this example, the direction of the animation is specified since the player needs to be facing up while moving down to climb down a ladder. Once the player reaches the bottom, the animation is cleared and the player is moved away from the ladder event with the script call again.

Pixel Movement

In all past tutorials, I have been using the GALV plugins for Diagonal Movement and to handle Idle / Walk / Run / Jump animations. While that worked, movement on a 2.5D map while tied to the RPG Maker Grid was clunky, and required extra work to use grid size plugins to match the 32×32 size of the graphics.

Recently, I have been switching over to the Quasi plugins to do Pixel movement instead, and letting QSprite handle the animations. As I have learned these new plugins, I have become a convert because of the smooth movement, easy access to multiple animations, and some new extra tricks I have gained from using them.

First, to get the plugins: https://quxios.github.io/plugins
There are several plugins available here, but the ones I am currently using are:
QPlus
QMovement
QSprite
QCollisionMap
You will also need the QSprite Editor to be able to us QSprite.

With QPlus and QMovement loaded and no plugin settings changed, you already have Pixel based 8-direction movement in your game. However collisions are still tied to passable / non-passable grids or events. This is where QCollision Map comes in.

Starting with this basic map:

I then create a new layer in GIMP to design my collision map. With QCollision, any area on the collision image that is transparent will be passable, while any areas that are colored will be blocked from movement.

In the QCollisionMap plugin settings, you can set a path where the Collision Map images will be stored.

Export your Collision Map image into this folder. Personally, I like to name my collision maps with the map number so it’s easy to match them up. So the collision map for map 002 is named 002.png.
However you choose to name your collision maps, you will then have to attach it to your map through the Map Notes.

Here is an example video walkthrough of some maps set up to use QMovement.

Roofing – Part 1

Part 1 of a video tutorial on my method of building roofs on houses.
Instead of trying to fit everything on the grid perfectly as tiles, I extend out large roof parts, then trim them to fit my building.

I started doing this to avoid the extra tall roof that the tiles create when building very large buildings, and found that it lets me be a lot more flexible with building designs.
This first video starts with some simple roof styles.

Design a site like this with WordPress.com
Get started