Tutorial: Tile Edits

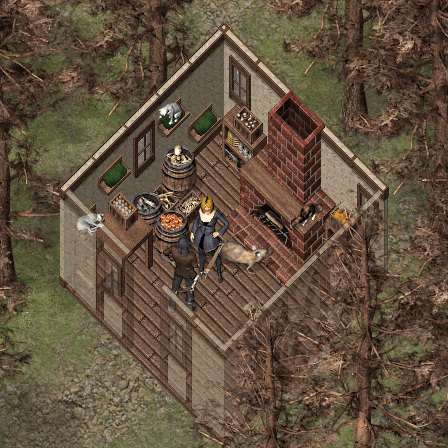
One of my first major edits was to create a new fireplace for the 2.5D tiles. I felt like I needed one that would fit into the normal sized walls, while the one that was released with them looks like it is two stories tall.

After that, one of the things I find that keeps maps interesting is to have a lot of variety in the contents of shelves and containers. When using Parallax maps, there is no downside like there is when using tile sets.

This guide shows step-by-step how I built my fireplace, as well as some other edits to get you started.

Click to access edits.pdf

And here is also a short video of the process to create open filled barrels.

Tutorial: Parallaxing Rivers

This is from another request that was posed about doing water edges. This one was made with the Medieval Tile Sets but can be done just as well using the Cliff or River tiles from 2.5D.

Click to access parallaxingrivers.pdf

I have to mention that this would never have been possible if Jesse hadn’t started me off with his own video tutorials which are where I learned the right way to make use of these cliff tiles.

Another trick that I learned from Jesse is making two animated water layers. Have the upper layer semi-transparent and moving in a different direction than the bottom layer.
With GALV’s Layer’s Plugin:
LAYER 001 11 Water -.25 -.25 100 0 0 0 0 0
LAYER 001 10 Water .25 -.25 255 0 0 0 0 0

The X and Y movements can be adjusted to change the speed and direction the water is moving. Here is an example from my latest project, including a direction change in the water animation attached to an event that was handy. You can see that the second set of animation settings work much better for this particular map.

Tutorial: Basic Mapping

And now the first real tutorials I have ever created. For these, I created a new house design specifically for the purposes of this tutorial, trying to add some complicated and maybe sometimes nonsense layouts just for the purpose of generating how-to’s.

The first tutorial creates the interior of this house, and includes all setup to create the map and layers inside of GIMP, as well as the Addons and Setup to make this a playable map in RPG Maker MV. The second tutorial is my way of adding a non-standard roof to a building, and also includes the “disappearing roof” which is actually simple after going through the first tutorial.

Click to access buildinglayers.pdf

Click to access buildinglayersroof.pdf

The Disappearing Roof

Before I go any further, I have to get my shout-out to PVGames for the awesome graphics that have inspired everything I have done here, and to Kadokawa/Degica for RPG Maker MV which has given me an place to use them.

http://www.pioneervalleygames.com/index.html

https://www.rpgmakerweb.com/

And now, for the one thing I became famous for: The Disappearing Roof

These were the source of the first “How did you do that?” questions that resulted in the tutorials that follow.

Zyph’s Designs

I have been an excited user of the Pioneer Valley Games (PVGames) graphic sets ever since the first High Fantasy set was released several years ago. With the release of the latest series of 2.5D graphics and a Discord for users, I started publishing a lot of test maps and ideas to inspire the rest of the community.

This led to frequent questions of “How did you do that?”. Since then, I have been creating PDF Files and more recently some YouTube videos to show my ideas or answer questions. Now with some of those PDF’s lost in time on the Discord, I decided it was time to have place to keep thing’s organized.

Most of what is here is solutions I have come up with for solving problems while using these graphics in RPG Maker MV. I know my way won’t always be the best, and I am always learning new ways to do things from others.

I do hope the content here will continue to help others work out issues and systems, and inspire new creative ideas, and lead to people discovering their own newer and better ways to do things.

Design a site like this with WordPress.com
Get started