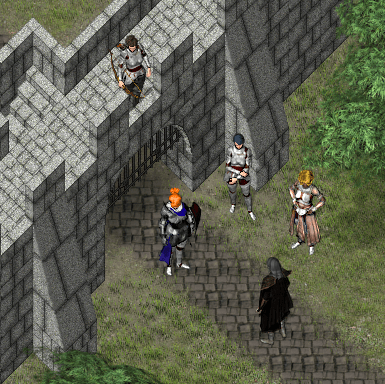
I haven’t had much inspiration in my game project lately, so haven’t been coming up with many new tricks to show.
But I did decide to record the full building of a smaller map I just did to give an idea of my build process. It does include a couple of minor edits made along the way.
Recolors: Hair & Rocks
I am a large fan of the Colorize tool in GIMP. In most maps I create, colors have been adjusted for many things to either fit the setting better or to change contrast between foreground and background items, or just adding variety.
Below are some of my presets that I find useful to have available. For the rock recolors, I tend to use them as is to be consistent across maps. But for hair, using these bases then making small adjustments to Saturation and Lightness can give a wide range of variety for characters and NPCs.
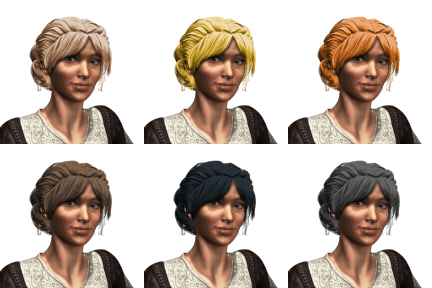
Hair – Light Brown
Hue: 0.0776
Saturation: 0.3400
Lightness: -0.200
Hair – Yellow Blonde
Hue: 0.1221
Saturation: 0.6800
Lightness: -2.000
Hair – Red
Hue: 0.0730
Saturation: 0.7200
Lightness: -0.300
Hair – Brown
Hue: 0.0776
Saturation: 0.2400
Lightness: -0.600
Hair – Dark
Hue: 0.5800
Saturation: 0.1800
Lightness: -0.800
Hair – Dark Greying
Hue: 0.5800
Saturation: 0.1000
Lightness: -0.600
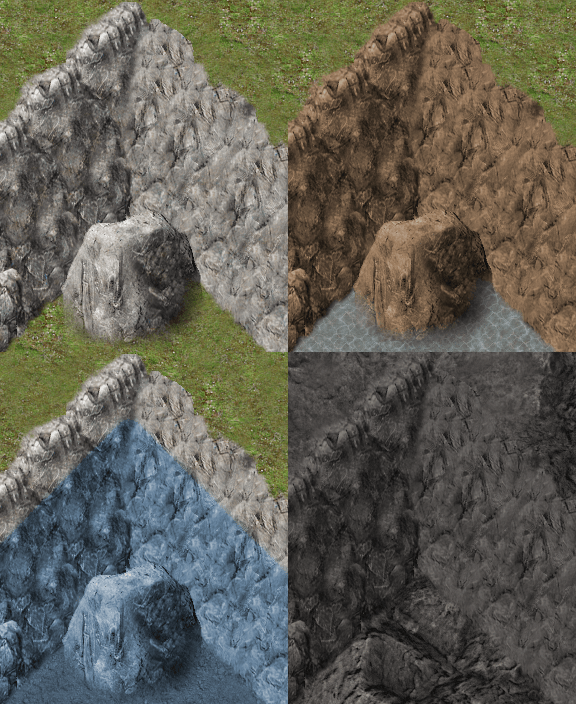
Rock Recolors always start with the original grey cliff tiles. The Underwater recolor can be applied to anything that will sit below the surface of the water. I use this one with a semi-transparent water layer over it.
Rocks – Brown
Hue: 0.0800
Saturation: 0.2400
Lightness: -0.300
Rocks – Under Water
Hue: 0.5785
Saturation: 0.2093
Lightness: -0.122
Rocks – Infernus
Hue: 0.0552
Saturation: 0.0320
Lightness: -0.465

Evented Character Selection
As a player, I like having choices between what type of character to experience the story as. And while there are probably plugins that could do this easier, I enjoy finding ways to do things with events instead of cluttering up my project with yet another plugin when the opportunity comes up.
In short, this works as a blank map with three walkable tiles that update the picture when the character steps on each tile, all surrounded by events that lock in the current selection when activated.
I have used this for Character Selection, class selection for a single character, and have looked at it as a way to give players a nice interface and informed decision making for a possible skill upgrade system I am working on.
Full details of the setup are included in this PDF:
https://zyphli.design.blog/wp-content/uploads/2020/02/eventedcharacterselect.pdf
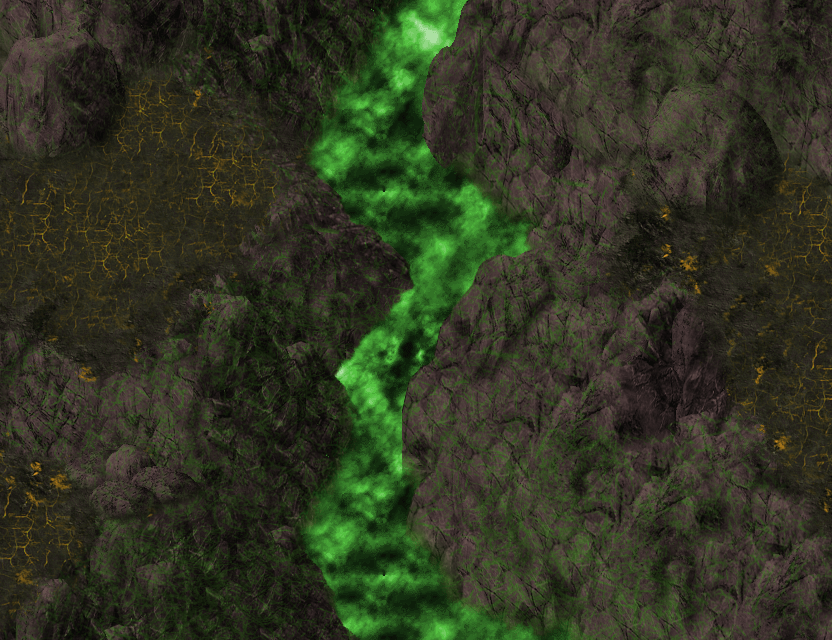
Hellscapes
The Hellscape is one of my favorite things I have done while playing with the PV Tiles. The technique is very simple, but effective.

Start with a map using the plain gray cliff tiles and recoloring them to a dark color. Then Duplicate them and make the copy a bright color that works with the map. Making sure the dark copy is on top, use a patterned eraser to start erasing part of the dark cliffs, letting the colored ones show through.
A Recolor of the Lava texture and the red parts of the ground tiles allows creating an alternate version of this for an alternate version.
Common Events: Getting Items, Weapons, and Armor
Following up on the last Common Events tutorial, the same method can be used to keep message boxes consistent when acquiring weapons, armor, and other items as well as just gold.
Gold was an easy starter because there is an event command for adding a variable amount of gold to the player’s inventory. To do the same thing with Items, Weapons, or Armors will require inserting a script command.
For this, I will first create two variables:
02: Get Item
03: Get Quantity (this is the same one used for the gold in the previous tutorial)
I can then create three common events (Item, Weapon, and Armor) to be called that will add the specified quantity of the specified item to the inventory, play an appropriate sound effect, and display a message to the user.
– I am again using Yanfly’s Message Core to restrict the size of the message box to one line, and also to add the icon and name of the acquired item to the message.
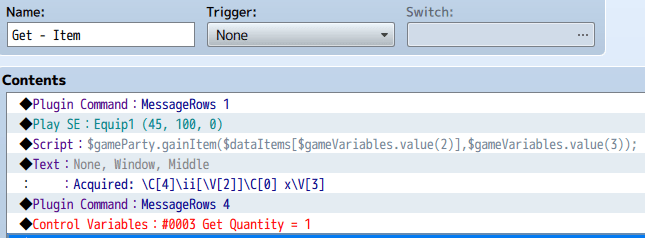
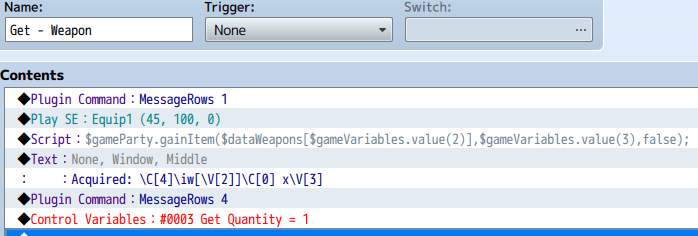
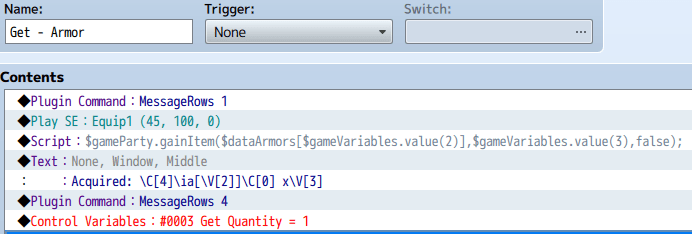
To make it easier, below are the script commands for each of these to copy into your own common events. Change the 2 to your variable for the item being acquired, and replace the 3 with your quantity variable.
$gameParty.gainItem($dataItems[$gameVariables.value(2)],$gameVariables.value(3));
$gameParty.gainItem($dataWeapons[$gameVariables.value(2)],$gameVariables.value(3),false);
$gameParty.gainItem($dataArmors[$gameVariables.value(2)],$gameVariables.value(3),false);
Then, when you find an item, the hardest part of this is setting the Get Item variable to the item number of that item from the database. While you can also set the quantity, I have found that most of the time, I am only adding one of an item, so all of my Get events reset the quantity to 1 at the end, so this only has to be set for items where the player gets more than one of an item.
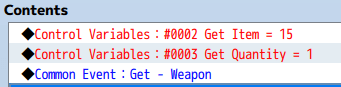
An example of how this looks:

Common Events: Sounds and Getting Gold
Common events allow for repeating common sets of commands that will be used throughout the game. They are also very useful for keeping consistency throughout your game.
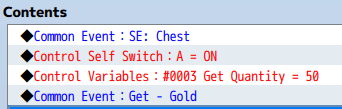
One use I have for common events is for event-based sound effects. It may sound silly at first to have a common event with only a single command to play a sound effect, but consider this example:
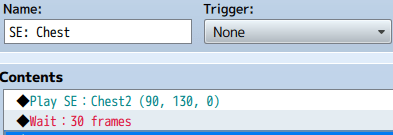
I play a sound effect for opening the chest, then another one to play a money jingle with the message box. If I find a better sound file for either of these later, I can change the common event for that sound, and all of my chest events will be updated. If I had the sound effect embedded directly into the Chest Event, I would have to go through and update ever chest in my game.
* I also use Yanfly’s MessageCore plugin commands to make the message box only 1 row high for this message, instead of having 3 blank lines.
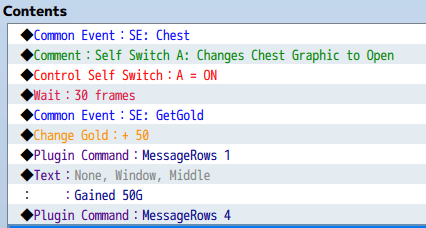
Looking at that example, there are still a lot of extra commands that have to be continuously repeated ever time a chest is opened. This could be further refined to put most of the functionality of the chest into a common event.
In this new Common Event for receiving gold, I add all of the message box commands to the common event along with the sound effect. Since the amount of gold received will change each time it is called, I now use a variable (3: Get Quantity) to store the amount of gold that will be added. This can be used in both the display message using \V[3] to display variable 3, and also in the Change Gold event command to add that much gold to the player’s inventory.
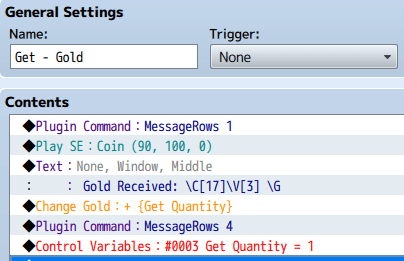
With this, the event for the chest gets simplified. This also allows me to make changes to the message that goes with acquiring gold if I want to change the text, or colors, or add an icon, and all messages where gold is received will be updated.
Notice that the 30 frame wait also was removed, because I realized it makes more sense to include the wait in the sound event itself so if I change the sound, I can also adjust the wait appropriately to match the new sound.
I don’t include the sound and wait for opening the chest in the Get Gold event because it could be possible to get gold from other sources, and I still want to keep the message and sound consistent across all of them.
With this, while designing a game, I can put placeholder sounds for everything: Gain XP, Pick Up Item, Party Member Join, Party Member Leave, Open Door, Close Door, or anything else I can think of, and not worry about missing it somewhere when I possibly purchase and put in the final sound effects later.
Using 2.5D Cliff Tiles
These are a couple of quick videos that I set up after people on the Discord were asking how to make the use of the Cliff Tiles.
My personal opinion is to not get overly stressed with them. I go in with a basic idea of what I want to see, then just start tossing out chunks and let it flow organically.
The decals that are provided are great for cleaning up edges as well as keeping them from looking too repeated.
And since I am also often asked about the brown cliffs that I use so frequently, they are just a GIMP Colorize of the Grey Cliff Tiles:
Hue: 0.0800
Saturation: 0.2400
Lightness: -0.300
Battle Stats Spreadsheet
My starting hero does 10 damage to a monster. He picks up his first sword, and suddenly does 80 damage. This is usually my experience when trying to set up a battle system, so I have been working for a while on a spreadsheet to try to help me see how damage will change when the character levels up or equips a new item.
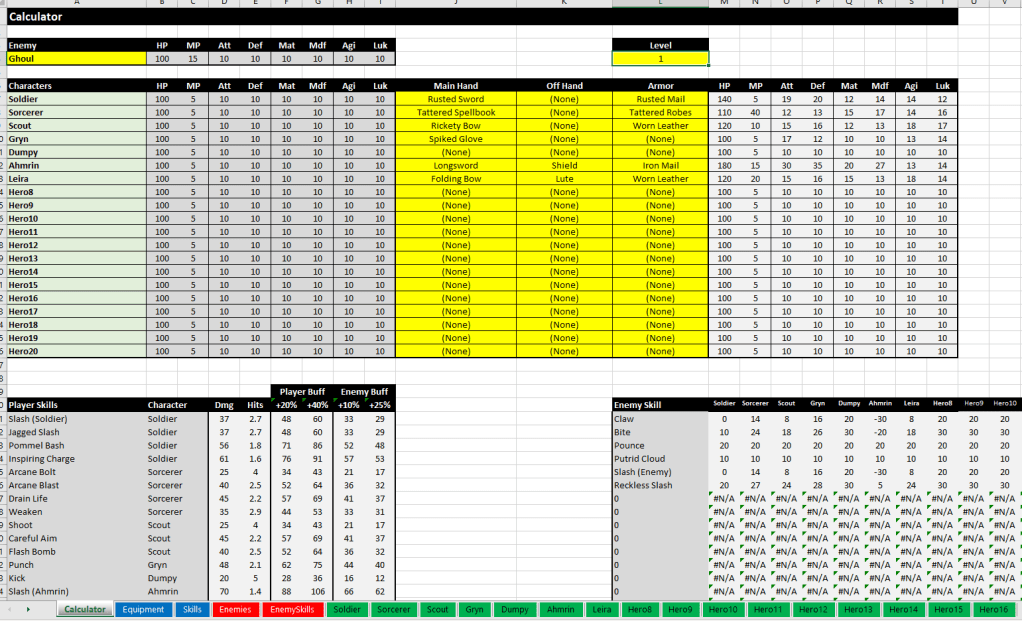
I’m putting it out here if anyone else wants to play with it. It comes with some completely terrible stats in it just to have a baseline example to see how it works.
https://zyphli.design.blog/wp-content/uploads/2020/02/calculator_rpgmaker.xlsx
Weapon Swaps with PV Characters?
One of the first concerns that came to my mind when starting with the PVGames characters was that with the weapons attached to the character sprites, it initially looks like each character will be locked to a specific type of weapon. For years, I have locked myself into that perceived limitation.
However a recent discussion in Discord led me to go back and re-think this, and I realized that a character could easily use up to 5 different types of weapons by using Yanfly’s Action Sequences.
There is a little more setup to this, since each skill has to be tied to an appropriate weapon. This can be as simple as making an Attack Skill for each of Mace, Sword, and bow. Or you can take this as an opportunity and make flavorful Attack Skills Bash, Slash, and Shoot for each weapon.
After the skills are set up, weapon-appropriate attack animations can be set in the action sequence so that he character appears to have the correct weapon equipped.
Here’s the breakdown on the full setup:
https://zyphli.design.blog/wp-content/uploads/2020/02/weaponanimation_attackonly.pdf
It is possible to take things further and have the character walking around with a weapon drawn, but it does have more limitations. Perhaps there are plugins that can do more, but for this, I am using events for all weapon swaps to be able to change out the entire graphic sheet of the character. This works for me since I am using a weapon upgrade system instead of finding/buying random weapons, so only one character has a weapon swap skill to change between using his Sword or Mace. The up side to this is he can also use this skill mid-combat to change his tactics during battle. Taking it further in this example, I also added the ability for the character to upgrade from equipping light armor to heavy armor, which also affects his character sprite and face graphic.
I have not written out a full tutorial on this setup since I don’t believe it will be of use to most people with the restrictions it places on finding and replacing weapons.
Creating Characters
Over time, several people have asked how others work with the large character sheets.
Personally, I have each set of sheets (Face, Paperdoll, Sprite1, Sprite2, Sprite3, Sprite4) layered into two GIMP files (Male and Female). This makes it quick and easy to show/hide/duplicate/recolor layers for quick character builds.
Yes, the files are getting very large and are getting slower to load and save as new characters are released, but I find them very convenient to work with.
* The size did catch up to me when recording videos, so I have cropped them down to a smaller portion of the whole sheets for these videos.
For Sprite Sheets, there usually isn’t much actual editing needed. And for NPCs, I normally don’t need a full animation set, so I create a single character sheet with multiple NPC’s, then have all of those NPCs set up for Direction Fix On when creating their events in RPG Maker.
For NPC and Character Faces (or Paperdolls and Busts) there is a lot more room for customization to make each individual character stand out.
